

Table of contents:
- NgRx requirements
- Introduction to NgRx – let’s begin!
- Undo/redo canvas signature
- Output from realtime NodeJS process
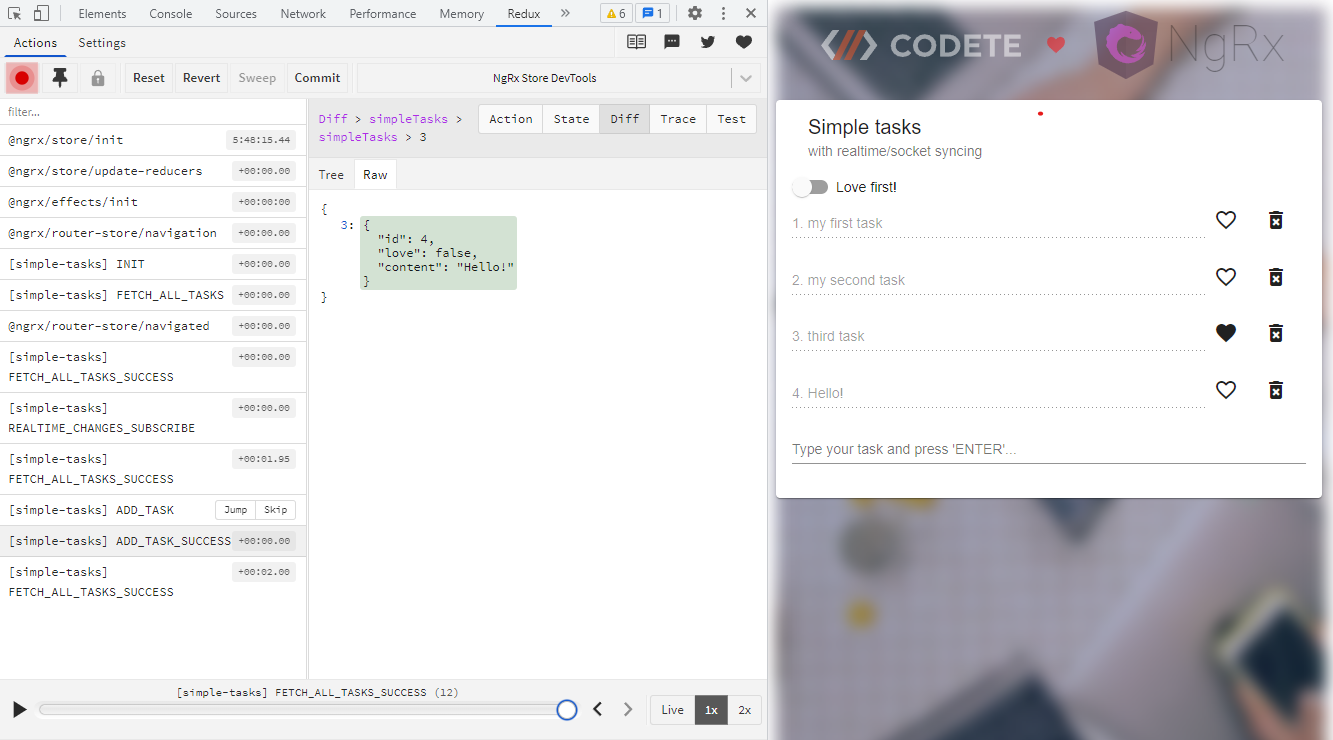
- Using NgRx to build simple NgRx tasks application with realtime/sockets syncing
- What to keep in mind – closing remarks
NgRx requirements
What you need to start your adventure with NgRx is some basic knowledge about JavaScript / TypeScript / Angular / RxJS* / NodeJS.
*If you feel like you lack some RxJS knowledge, please check my previous blog post RxJS Quick Introduction (with Examples) for Beginner-Level Angular Developers with a quick introduction to RxJS – the tips included there refer to 90% of the issues you face in your daily work with this library.
Before we start…
I would like to mention that all code from this “quick introduction” is open-source and available on https://github.com/codete/codete-ngrx-quick-start.
For any NgRx-based development, I recommend using the addon (browser addon) Redux DevTool https://github.com/reduxjs/redux-devtools to see clearly what is going on inside your NgRx application.

Introduction to NgRX – let’s begin!
Creating and maintaining complex applications have always been a challenge for developers. It is an even harder task when you also have to deal with data, events, and code complexity that make:
- debugging,
- adding new features,
- fixing bugs
really complicated. Library NgRx can help you a lot in all of those areas (1, 2, 3) if you use it in the right way. It can make super complex applications created in a “normal” way look easy to understand.
Anyway… starting from the beginning: NgRx is Angular's package that utilizes the power of Redux. Redux is a library for immutable, predictable state management, which is simply a JavaScript container for your whole application state, so you can look at it more easily and have a lot more control over it (in the opposite situation, you would have lots of components pilling up with lots of data and events which make the whole application messy/unknown).
If you are a newbie in Angular you may not understand it yet, but I can assure you, that sooner or later in your career, you will face a problem large enough or complex enough that the only right solution to choose will be using one with “store” like NgRx (store means a single place in your app with all data).
For the purpose of this tutorial, I have created 3 apps just to give a spicy insight into the improvements NgRx can give you. I hope that at the end of this tutorial, you will feel powerful and you will be using it successfully.
But... first of all... let's have some basics explained just to get a better understanding of the new development concepts.
Components vs Containers
You may wonder what the difference is between components and containers, and why not just use components everywhere…
Well... imagine you have a lot of components, and you just want to modify/map some data somewhere, but neither of your components gives you a clear indication of where to look for this specific place in the code – meaning you have to spend time searching for components that are actually reaching for data... In other words, poor design of architecture.
NgRx has a solution to this – containers. Containers are actually components with a replaced class name part “component” to “container” for the purpose of better recognition of what is inside and what the component actually does (it gathers real data and has an access to store).
There are 2 categories of components:
1. Components for data gathering (and you will name them containers)
2. Components which are “dummy” – just for the purpose of displaying data based on Input()-s
Actions
The concept of Actions is crucial to understand Redux/Store-based apps. Actions are actually events in your application, however not to be confused with specific code executors. It means that you do not use actions to execute specific code from your RxJS application – but you use it to trigger/notify the NgRx engine about specific, abstract occurrences that happen in your code, such as fetching data, leaving a page by the user, undoing previous state of the app, etc.
Actions can be visible in your Chrome React Tools (How to access Redux DevTools in Chrome), or you can just use console.log to output specific actions that are happening.
PRO TIP: You should never dispatch more than 1 action from 1 place in the code!
If you have a real need to do that – it is better to create a specific effect class that will react to your action by triggering the next action.
Of course, there may be places in your code with a specific function fetchData() or userLeavePage(), but in the NgRx/Redux world the role of Action comes down to generalizing states, behaviors, and events of the application, so you can separate them from the actual application.
This may seem strange at the beginning, but once you understand this concept, you will look at everything differently (better). From a software architect's point of view, it is a crucial thing to understand, because later it will allow you to scale complex applications.
Example of proper actions in code
(simple-tasks.actions.ts)
import { createAction, props } from "@ngrx/store";
// ...
export const DELETE_TASK= createAction(
  '[simple-tasks] DELETE_TASK',
  props<{ task: ISimpleTask; }>()
);
// ...
export const DELETE_TASK_SUCCESS = createAction(
  '[simple-tasks] DELETE_TASK_SUCCESS',
  props<{ task: ISimpleTask; }>()
);
Example of NOT proper actions in code
import { createAction, props } from "@ngrx/store";
const simpleTaskAction = '[simple-tasks] DELETE_TASK';
// We are losing clarity in code + we can’t just copy paste
// actions names from chrome-developer-tools
// ...
export const DELETE_TASK= createAction(
  simpleTaskAction,
  props<{ task: ISimpleTask; }>()
);
// ...
export const DELETE_TASK_SUCCESS = createAction(
  `${simpleTaskAction}_SUCCESS`,
  props<{ task: ISimpleTask; }>()
);
Effects, Reducers and Selectors
Actions alone cannot do much, but with Effects (that are just normal classes with “fancy” decorators) they enable us to reach for data, trigger other actions, and much more.
Effects are a sort of “backend” on our frontend NgRx store, a place where we can use Angular’s services, reach for data from the store, and dispatch this data when it is ready to be applied to the store without the possibility of direct store modification, as it is a reducers’ job).
Reducers are parts of the NgRx application responsible for applying data into the store in a direct way and storing some initial data.
Example reducer in code
import { createReducer, on } from '@ngrx/store';
const initialState = { tasks: [] };
// ...
export const tasksReducer = createReducer(
 initialState,
 // ...
 on(
   tasksAction.FETCH_TASKS_SUCCESS,
   (state, { tasks }) => {
     return { ...state, ...tasks: _.cloneDeep(tasks) };
   }
 ),
 // ...
}
You may be wondering what would go wrong in a situation when Effects replace Reducers in their “job”… actually, a lot of things. Reducers in nature are just “pure” functions that will always output the same results of the same given arguments. This “purity“ is needed so we can have a new pure state of store after each modification. This will allow us to “go back in time” with our whole application ( in chrome’s Redux DevTools) or create “undo/redo” functionality in our app. The key thing to understand from this is that Effect could do that, but it would be a messy, disastrous solution after some time.
Neither Effects nor Reducers can display data from the store – for this purpose we have Selectors.
Selectors, again, are the patterns that keep our application in a good shape for many years. Imagine getting data, just like in the example (Example how to not access the store) – if any changes were applied to the code, we would not know:
- what was the actual purpose of its component,
- if raw selecting data from the store was up to date, or any transformation was needed.
All of the above problems can be solved just by following simple rules just like in this example (Example how to access store with selector). We can chain selectors into trees for events for more data aggregation and with a proper naming convention. Applying this approach will help us to see immediately, what the component actually does.
Example of how to NOT access data from the store
import { Store } from '@ngrx/store';

...

@Component(...)
export class ExampleContainer {
  // ISSUE 1. container component should have proper name

  // ISSUE 2. only containers should access store
 constructor( private store: Store<any>  ) { }

  // ISSUE 3. selector should be reusable
  someDataToDisplay$ = this.store.select( d => d.somedatainsidestore );  }
Example how to access the store with a selector
import { Store } from '@ngrx/store';
import * as mySelectors from './my-selector-file.selectors';
// ...
@Component(...)
export class ExampleContainer {
   constructor( private store: Store<any>  ) { }
   someDataToDisplay$ = this.store.select(mySelectors.getSomeData);
}
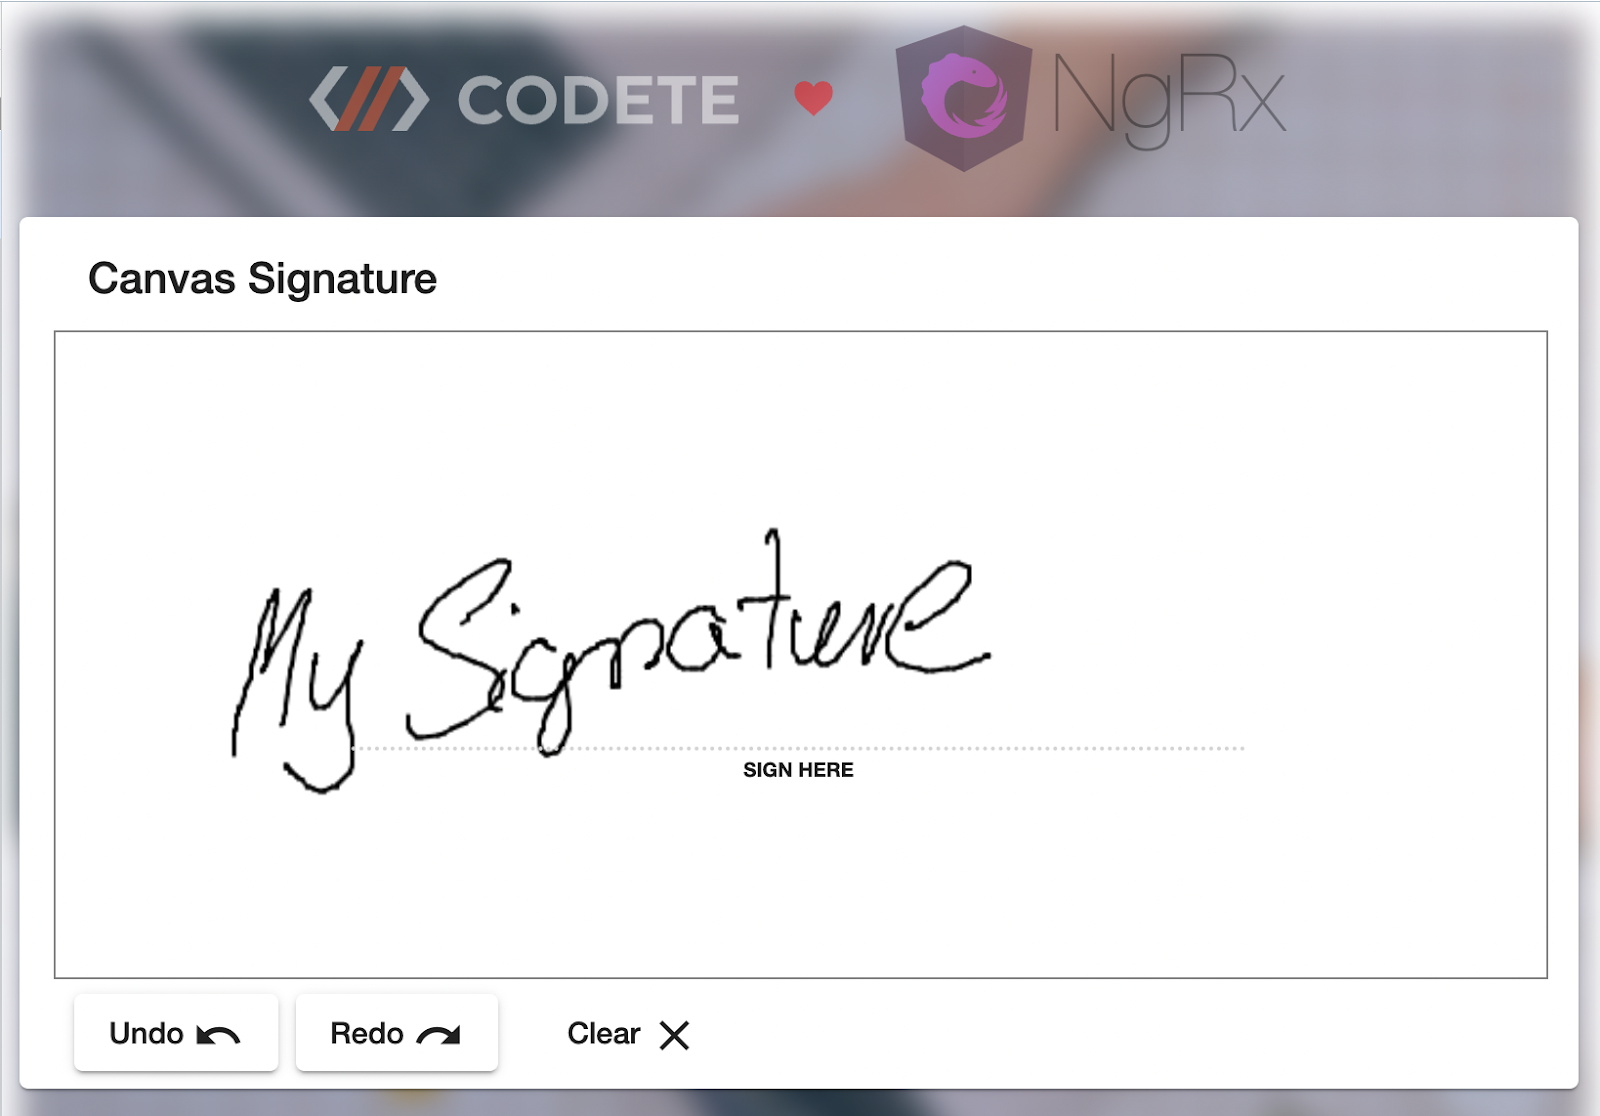
Undo/redo canvas signature
As I mentioned in my previous article about RxJS, it is important for the development of our projects to start them on the highest possible abstraction level, as well as much beneficial for us is to have a small example, a small “template” project at the beginning which would help us to familiarize with tools/patterns that we are going to use and keep this project in “pocket”. Thanks to it, we will worry less about forgetting small, but important stuff.
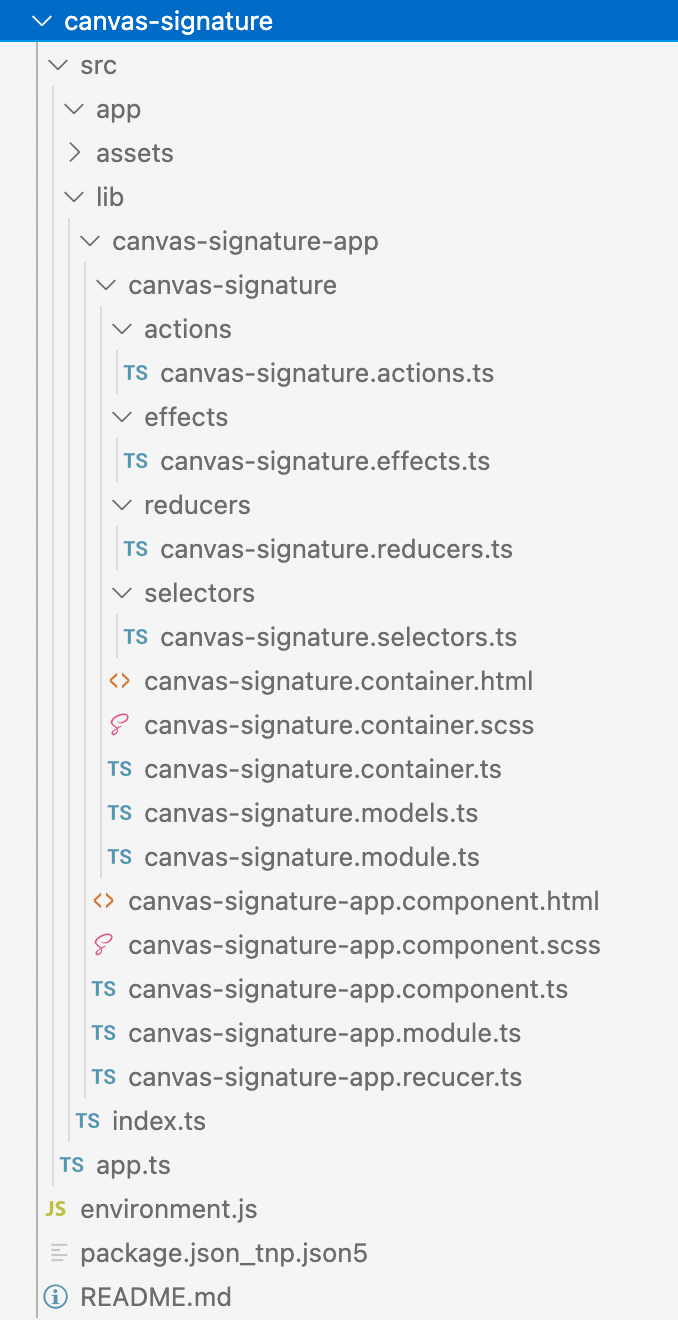
Proper structure of NgRx apps
The first application presented in this article – Canvas Signature – shows us how to properly “undo” and “redo” the state of our application. The operation of “drawing” is a perfect example of a situation where we want to go back one or two steps or revert to an app state.
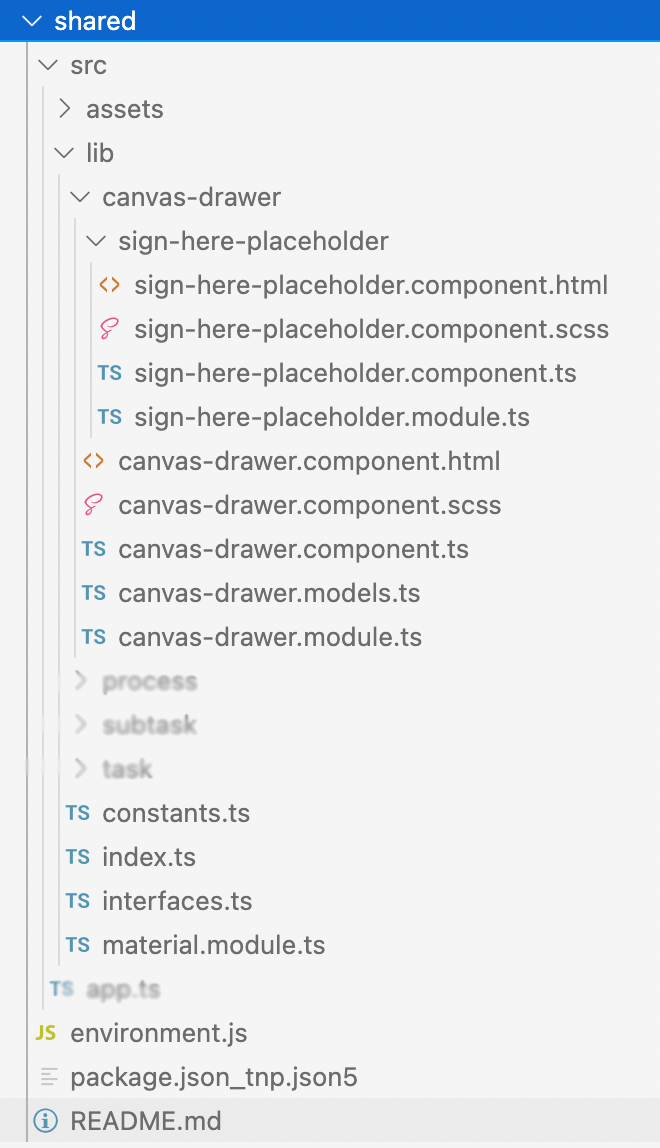
The structure of this application is simple and easy to understand if you pay attention to previous examples. Also again the “dummy” components are being put into a shared module for better future reusability.
Structure of the Canvas Signature application
This application has only 4 actions, with just 1 action NEW_CANVAS_DATA_BATCH for putting new things into the store. Property batch on action here means an array of pairs of pixels that html5 canvas needs for drawing lines between points.
Actions for the Canvas Signature application
(canvas-signature.reducers.ts)
export const UNDO = createAction(
 '[canvas] UNDO'
);
export const REDO = createAction(
 '[canvas] REDO'
);
export const CLEAR = createAction(
 '[canvas] CLEAR'
);
export const NEW_CANVAS_DATA_BATCH = createAction(
 '[canvas] NEW_CANVAS_DATA_BATCH',
 props<{ batch: PixelsBatch; }>()
);
Inside the reducer file, we have all magic responsible for undoing and redoing action on our canvas. Actions UNRO, REDO can be implemented in many different ways, using stacks, lists or/and their immutable counterparts (more here https://immutable-js.com), but for this tutorial I’ve used standard JS array, which really makes things simple.
Actions for the Canvas Signature application
(canvas-signature.actions.ts)
on(
   canvasSignatureActions.NEW_CANVAS_DATA_BATCH,
   (state, action) => {
     const newState = _.cloneDeep(state);
     newState.batches.push(_.cloneDeep(action.batch));
     return { ...state, ...newState };
   }
 ),
 on(
   canvasSignatureActions.UNDO,
   (state) => {
     const newState = _.cloneDeep(state);
     newState.stack.push(newState.batches.pop());
     return { ...state, ...newState };
   }
 ),
 on(
   canvasSignatureActions.REDO,
   (state) => {
     const newState = _.cloneDeep(state);
     newState.batches.push(newState.stack.pop());
     return { ...state, ...newState };
   }
 ),
 on(
   canvasSignatureActions.CLEAR,
   (state) => {
     return {
       batches: [],
       stack: []
     };
   }
 ),
The application Canvas Signature has only 3 selectors: allBatches with all data that we need to draw from the actual frame and 2 selectors (allowedToUndo, allowedToRedo) to prevent user undoing or redoing operation when it is not possible.
Selector for the Canvas Signature application
(canvas-signature.selectors.ts)
import { createFeatureSelector, createSelector } from '@ngrx/store';
import { canvasSignatureFeatureKey, CanvasSignatureInitialState } from '../canvas-signature.models';

const canvasSignatureFeatureSelector = createFeatureSelector<CanvasSignatureInitialState>(canvasSignatureFeatureKey);

export const allBatches = createSelector(canvasSignatureFeatureSelector, state => {
 return state.batches;
});

export const allowedToUndo = createSelector(canvasSignatureFeatureSelector, state => {
 return state.batches.length > 0;
});

export const allowedToRedo = createSelector(canvasSignatureFeatureSelector, state => {
 return state.stack.length > 0;
});
When we look for a moment at this application’s structure/behavior/general idea, we may find out that, actually… there is a lot of room for improvement, and that the things that we would consider hard to implement in the past have become easy to understand.
Store solutions for things like text editors, drawing software, or any undo/redo application are, in most cases, the only reasonable choice.
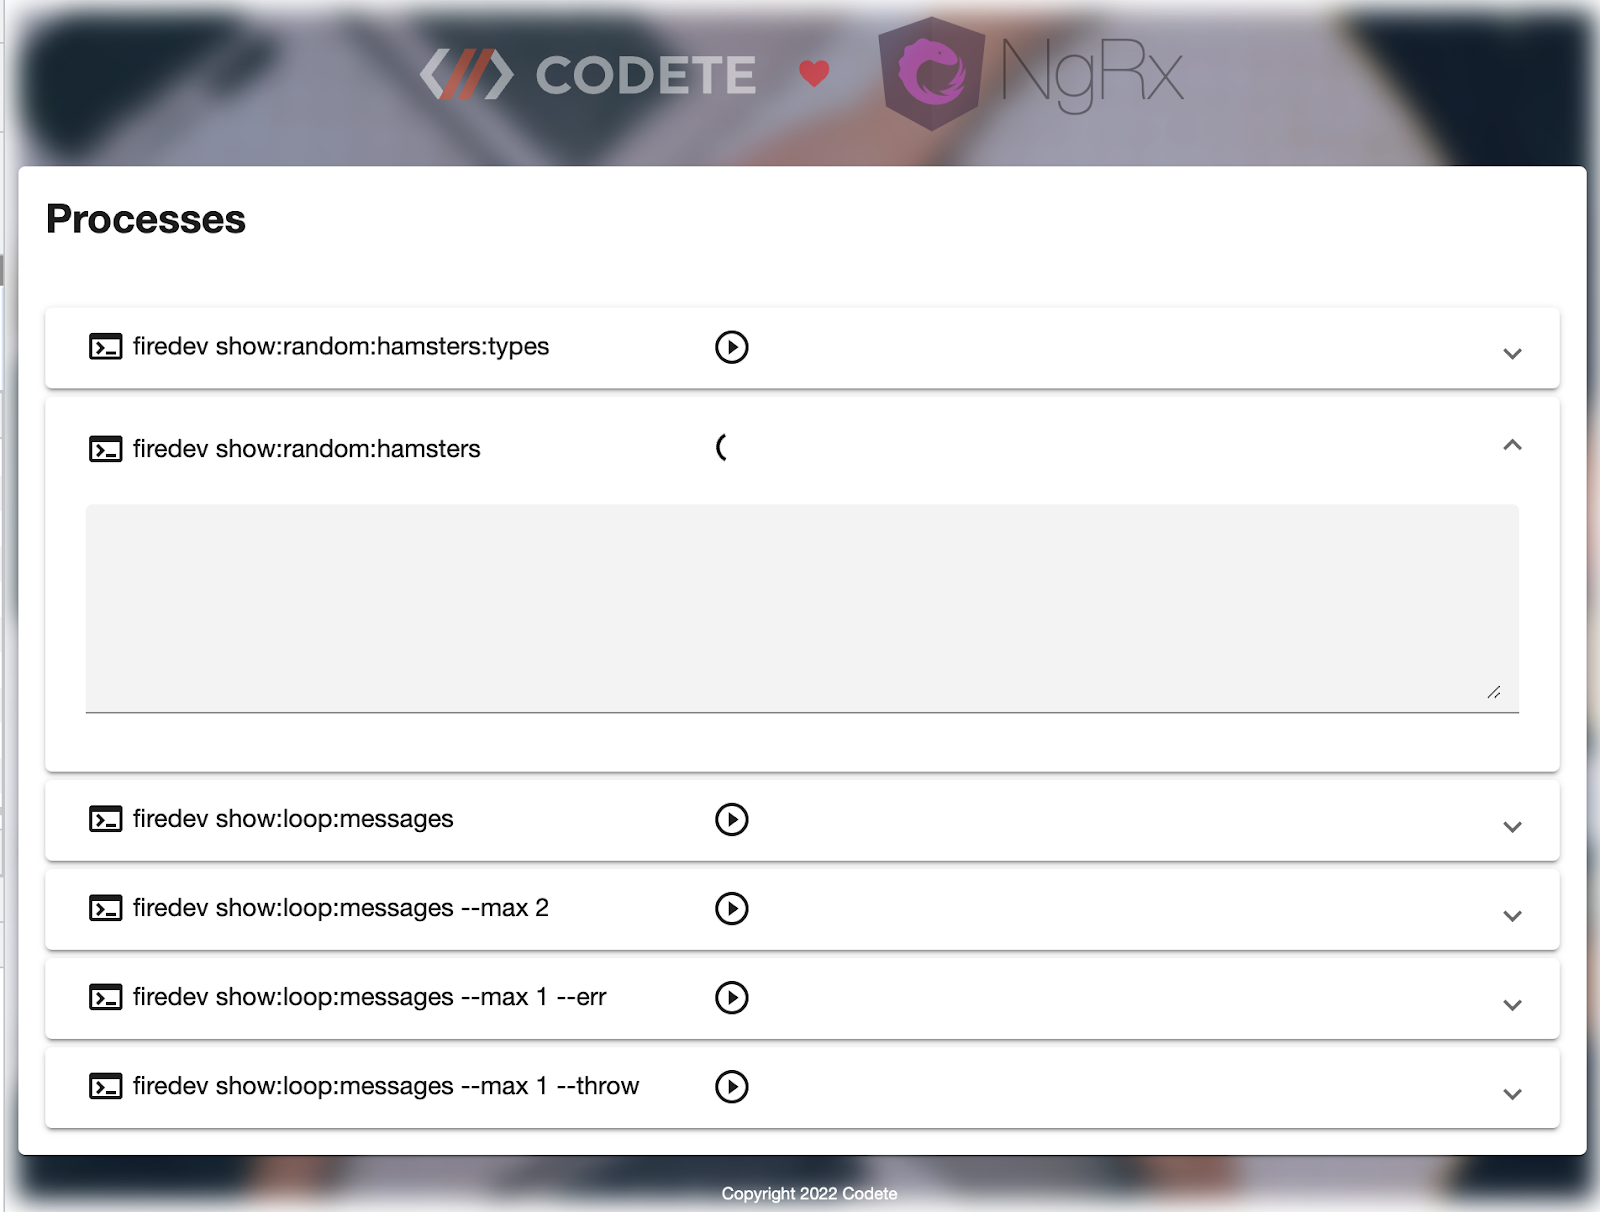
Output from realtime NodeJS process
The next thing I would like to present is the application for collecting outputs (in realtime) from the NodeJS processes. It is a perfect example of how sockets (UDP communication) can be utilized for smooth realtime frontend application updates and how the package @ngrx/entity can be used for better management of our immutable entities/objects.
Handling multiple asynchronous events
When we struggle with many asynchronous events, NgRx should be a natural choice for us. Achieving similar results without NgRx is possible, however, we may get lost in debugging as multiple events from multiple different entities will occur at the same time.
For the implementation of sockets communication, I’ve used the socket.io library with some wrappers around it. In this app the general idea of the communication between the client (browser) and the server is that the client first needs to “subscribe” to realtime events of the entity and later when we switch a page into an app, Angular’s method ngOnDestroy(...) triggers a teardown (unsubscription) from these events.
This way, we can subscribe only to things from the NodeJS server that we actually need on the current frontend page.
“Subscribe” here actually means that the browser client joins socket.io’s imaginary “room” with a specific name that contains entity name/id and socket.io on the server. What happens here is that the server will only be able to send database events (or any events) to users in that room, which will accurately target only specific clients (and not ALL clients).
Realtime entities syncing implementation
(processes.effects.ts)
// . . .
  realtimeChanges = createEffect(() => this.actions$.pipe(
    ofType(processesActions.REALTIME_CHANGES_SUBSCRIBE),
    mergeMap((action) => {
      return Firedev.Realtime.Browser.listenChangesEntityObj(action.process)
       .pipe(
        takeUntil(Helpers.ng.deserialize(action.destroy$)),
        debounceTime(500), // allow updates not faster than 0,5 second
        exhaustMap(() => {
          return Process.ctrl.getBy(action.process.id).received.observable
            .pipe(map(r => r.body.rawJson))
        }),
        map(process => {
          return processesActions.UPDATE_PROCESS({
            process: {
              id: process.id,
              changes: process
            }
          })
        })
      );
    })
  ));
// . . .
There real magic here is in our effects for Process entity. With the mergeMap() operator we allow multiple entities to subscribe to their own realtime changes and later with exhaustMap() we make sure that processes with pending updates have to wait for each executed http update request (which will allow the server to keep up with responses).
The slight difference between this app and our previous canvas-signature app is the implementation of reducers. Here we use the @ngrx/entity package that provides a wrapper for basic store operations on objects in arrays (in this case we have an array of Process entities).
NgRx entity wrapper implementation
(processes.reducers.ts)
export const adapter: EntityAdapter<IProcess> = createEntityAdapter<IProcess>();


const initialState: ProcessesInitialState = adapter.getInitialState({
 // place for additional state properties
});
export const reducer = createReducer(
 // . . .
 on(processesActions.UPDATE_PROCESS,
   (state, action) => {
     const actionProcess = _.cloneDeep(action.process);
      // . . .
      // there is also setAll, updateMany, addOne, addAll. removeOne etc.
     return adapter.updateOne(actionProcess, {
       ...state,
     })
   }
 ),
 // . . .
);
Speed up code with trackBy() pipe
Also worth mentioning here is the implementation of the processes list (with entities that can be changed separately) in ngFor loop with trackBy pipe. Without trackBy and with so many UI changes, Angular’s engine would be forced to rerender a significant number of elements in ngFor loop, which would reduce performance. Having trackBy increases our UI performance drastically.
In our example, each process instance beside fields for actual output like stderr, stdout (https://en.wikipedia.org/wiki/Standard_streams) has an id from the database. When using trackBy pipe with this id, we make sure that not a whole list of components is being re-rendered – but only specific parts.
How to not jam Angular *ngFor loop
(processes.container.html)
<mat-card>
  <h2>Processes</h2>
  <br>
  <app-process [process]="p"
     (processAction)="onProcessAction($event,p)"
     (subscribeRealtime)="onProcessRealtimeSubscribe(p)"
     *ngFor="let p of (processes$ | async); trackBy: trackByMethod">
   {{p.id}}
  </app-process>
</mat-card>
Main method for trackBy pipe
(processes.container.ts)
@Component({
selector: 'app-processes',
templateUrl: './processes.container.html',
styleUrls: ['./processes.container.scss']
})
export class ProcessesContainer implements OnInit {
// . . .
trackByMethod(index: number, process: Process): number {
return process.id;
}
// . . .
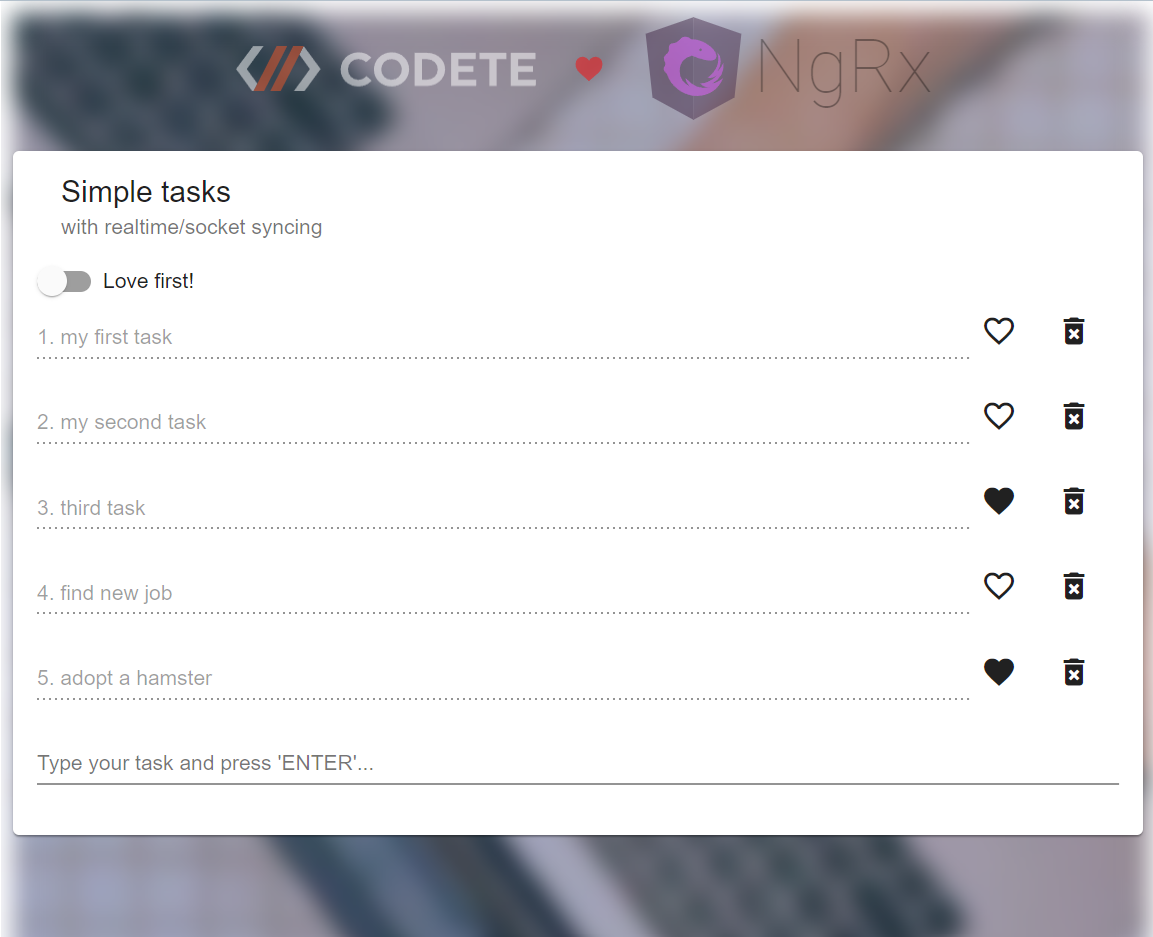
}Using NgRx to build simple NgRx tasks application with realtime/sockets syncing
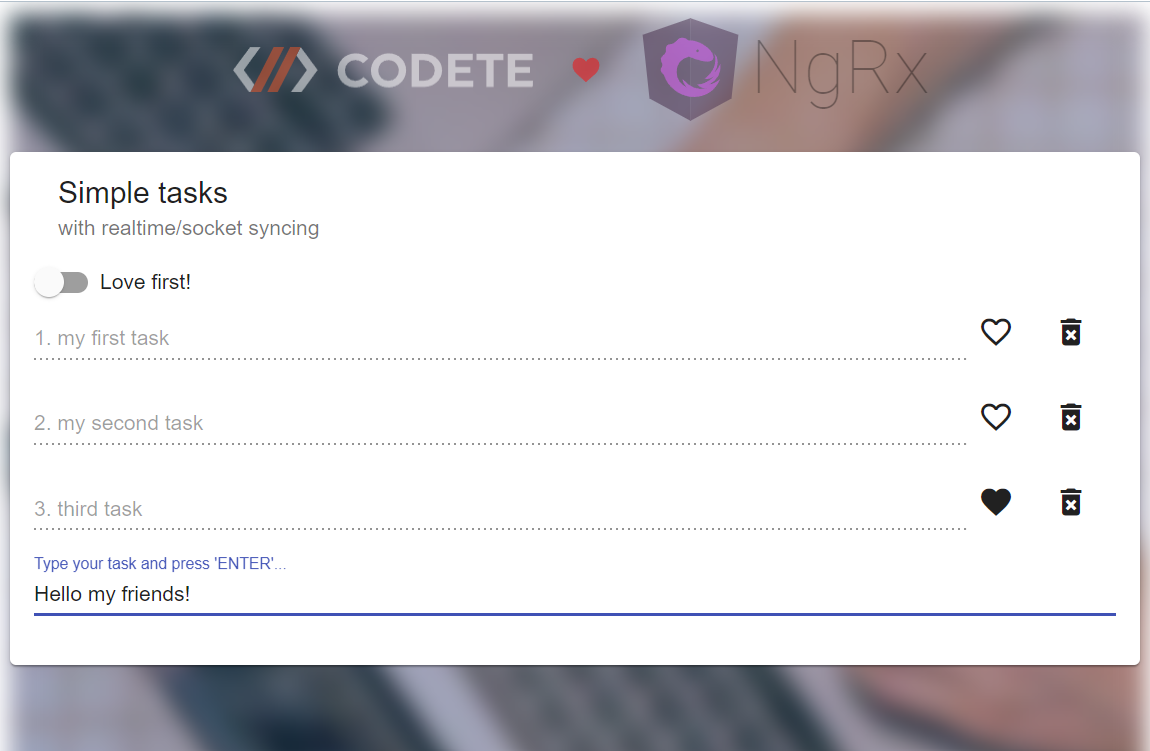
The last example in this tutorial (Simple Tasks) combines all the good things that we have learned so far in a simple tasks app with real time syncing of the whole list. CRUD applications like this one are everywhere and it is a good starter/playground for our ideas.
Realtime updates and CRUD operations
Actions of this application follow standard/simple NgRx structure for fetching/adding/deleting data, which may look as if they were doing redundant things in our code – not exactly.
Simple Tasks CRUD actions
(simple-tasks.actions.ts)
// . . .
// DELETE, ADD etc. actions structures are very similar
export const FETCH_ALL_TASKS = createAction(
  '[simple-tasks] FETCH_ALL_TASKS',
);
export const FETCH_ALL_TASKS_SUCCESS = createAction(
  '[simple-tasks] FETCH_ALL_TASKS_SUCCESS',
  props<{ simpleTasks: ISimpleTask[]; }>()
);
export const FETCH_ALL_TASKS_ERROR = createAction(
  '[simple-tasks] FETCH_ALL_TASKS_ERROR',
  props<{ error: any; }>()
);
// . . .
Partially its true that the code is redundant, and this problem has been resolved with @ngrx/data package (more in part 2 of this NgRx tutorial).
However, if we look at this redundancy in a different way, we will see huge benefits in the debugging/coding process. More description and more code here is actually something that you want to have – as much as possible when debugging events refer to more complex applications, with many many actions. Being able to quickly search specific places in your code just by looking at the action name, or see through editor references where actions are being dispatched, speed up the whole development process and make it easy to maintain it later.
Actions for handling realtime updates
(simple-tasks.actions.ts)
// . . .
export const REALTIME_CHANGES_SUBSCRIBE = createAction(
 '[simple-tasks] REALTIME_CHANGES_SUBSCRIBE'
);


export const REALTIME_CHANGES_NEW_DATA = createAction(
 '[simple-tasks] REALTIME_CHANGES_NEW_DATA',
 props<{ simpleTasks: ISimpleTask[]; }>()
);
// . . .
In our Simple Tasks app, besides CRUD actions, we also have actions connected to socket.io updates that are very similar to Realtime Processes example sockets implementation.
In our main container, we subscribe to realtime changes by dispatching an action with destroy$ subject as an argument that will unsubscribe from any changes during Angular’s ngOnDestroy() component. This simple approach should encourage us to use socket updates frequently in our NgRx journey.
Actions for handling realtime updates in simple-tasks.component.ts
destroy$ = new Subject();
// . . .
ngOnInit() {
   this.store.dispatch(simpleTasksActions.REALTIME_CHANGES_SUBSCRIBE({
     // we are passing destroy$ subject to easy unsubscribe without
     // additional REALTIME_CHANGES_UNSUBSCRIBE action
     destroy$: Helpers.ng.serialize(this.destroy$),
   }));
 }

ngOnDestroy(): void {
   this.destroy$.next(void 0);
   this.destroy$.unsubscribe();
   Helpers.ng.unsubscribe(this.destroy$);
 }
// . . .
Modern Angular/Ngrx applications are so to speak “screaming” to have realtime elements inside. That's why solutions like firebase (realtime Angular/RxJS database https://firebase.google.com) are becoming so popular, and NgRx seems like a perfect natural solution.
Operator withLatestFrom()
Application Simple Tasks, aside from CRUD functionality, has a special data filter – “Love first!”. This simple filter shows us how to gather the latest data from the store and use it to do something later (like in this example to get a list in different order with “loved” tasks at the beginning or normally ordered by creation date).
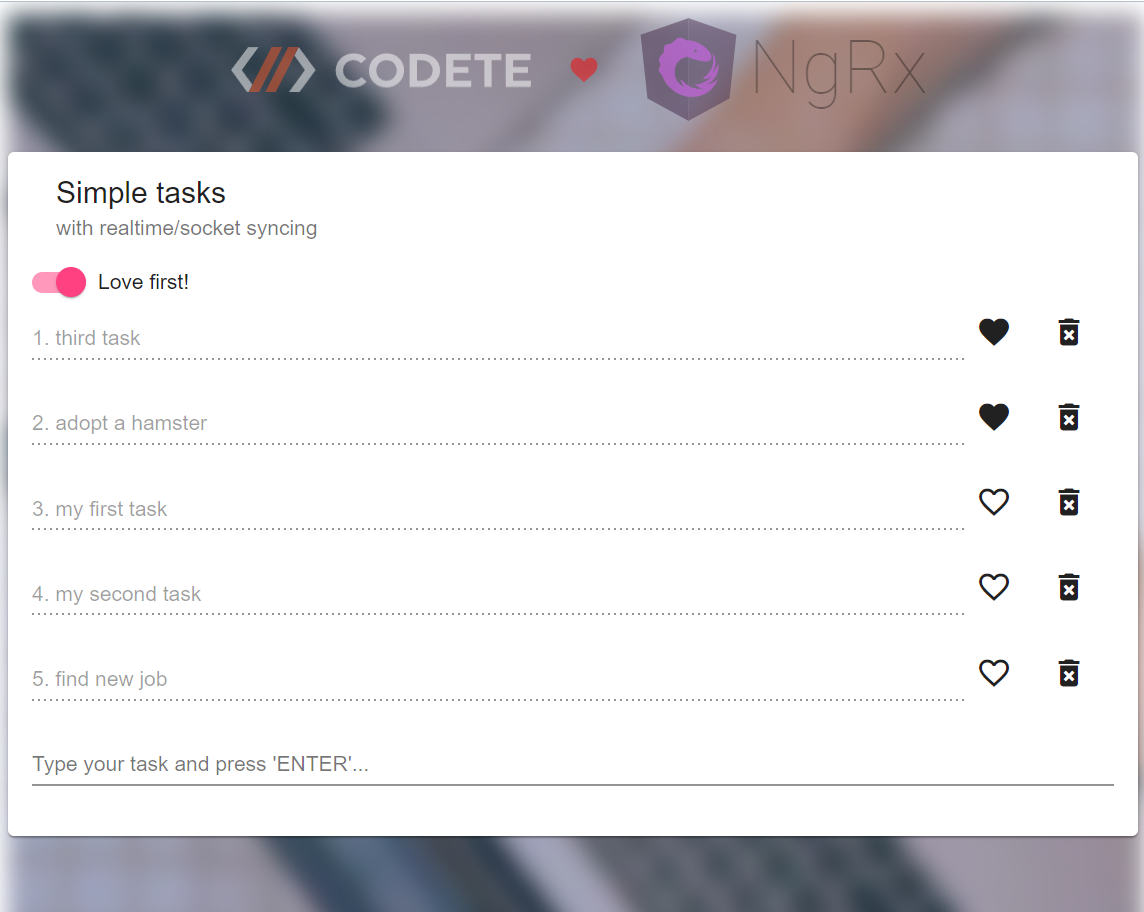
This simple order enabling button feature is a very common situation in NgRx development especially when you have tables, filters, paginations, that rely on config stored in the browser memory. Meaning that almost every time we want to get new data, we first look at the actual current state of the application, and then we gather only what is necessary by dispatching action either with params or without params, but with withLatestFrom (or similar operator).
Accessing the NgRx store before making an http request
(simple-tasks.effects.ts)
// . . .
fetchAllTasks = createEffect(() => this.actions$.pipe(
    ofType(simpleTasksActions.FETCH_ALL_TASKS, simpleTasksActions.ORDER_LOVE_FIRST),
    withLatestFrom(this.store.select(simpleTaskSelectors.loveFirstEnable)),
    switchMap(([action, loveFirst]) => {
      return this.service.ctrl.getAll(loveFirst).received.observable.pipe(
        // . . .
      )
    })
  ));
// . . .
Generally... dispatching action with params is only a good idea when we can’t get data by using operators that can directly access store. Places where someone is dispatching an action with a big chunk of parameters may also be an indication that we should rely more on operators, not arguments – or even worse… tightly coupled components with effects may be happening which is another common mistake.
Initial state of the Simple Tasks application
(simple-tasks.reducers.ts)
const initialState: SimpleTasksInitialState = {
  simpleTasks: [],
  loveFirst: false,
};
Action with 2 approaches
(simple-tasks.actions.ts)
 // . . .
// this action uses withLatestFrom() operator instead props
export const FETCH_ALL_TASKS = createAction(
  '[simple-tasks] FETCH_ALL_TASKS',
  // we could have props with
);
 // . . .
// this action uses props function because task model reference
// needs to be taken from container component
export const LOVE_TASK_SUCCESS = createAction(
  '[simple-tasks] LOVE_TASK_SUCCESS',
  props<{ task: ISimpleTask; }>()
);
 // . . .
What to keep in mind – closing remarks
During our journey with NgRx if we are not careful enough we can have a lot of trouble developing applications that don't have the right principles embedded within the code. Some of the common mistakes listed below I’ve mentioned already in this article, but it is worth mentioning them here again, to be always aware of them:
- mutating store data outside reducers,
- dispatching more than one action from one place/method,
- dispatching actions with arguments data that can be taken directly from store
- accessing store directly instead of creating selectors,
- using actions to execute a specific code instead of a specific abstract event
- using string interpolation or concatenation while creating action names.
Last but not least, after this tutorial, I would recommend building your own small application just to make sure that you have a good understanding of basic things from NgRx, which are crucial parts of big commercial projects.
I hope that my article has given you a quick insight into the NgRx/Angular world and also that gained knowledge has given you a fresh look at how you can write really complex applications without getting lost.